Teaching Rear Crosses: Step-by-Step Guide for Dog Agility
In this guide, we’re breaking down one of the most useful agility handling moves — the rear cross.
If you’ve ever found yourself behind your dog on course and thought, “How do I help them turn the right way without needing to run faster?” — this one’s for you.
We’ll cover what a rear cross is, why it matters, and how to teach it step-by-step so you can practice with your own dog at home or in your garden.
If you'd like to listen to this instead, here's the link:
https://open.spotify.com/episode/1TK9jE4w9DTKgVIXtigNWd?si=wvHyI8E5TXi9HmPRVi__Gg
What Is a Rear Cross?
Have you ever watched your dog power out of a tunnel, gain momentum… and suddenly realise you’re two jumps behind?
That’s where the rear cross comes in.
A cross is any move where you change the side you’re handling your dog on.
A rear cross happens when you switch sides while your dog is ahead of you.
It’s called a rear cross because the change happens behind your dog, not in front of them.
The key is that the dog must already have committed to the next obstacle — like a tunnel or jump — before you start to cross.
For example: cue “go,” let your dog drive to the first jump, and once they’ve committed, you can cross behind between jumps one and two.
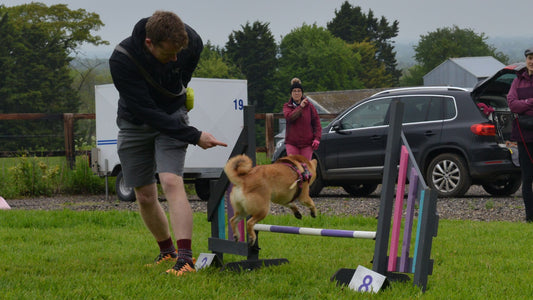
Let’s Walk Through an Example
Here’s what a rear cross looks like on course:
-
The dog comes out of a tunnel on the handler’s right-hand side.
- Ahead is a sequence that includes a ~ 270° right turn — for example: jump, jump, then a sharp ~ 270° right turn, followed by jump, jump.

-
The next part of the course requires a right-hand turn, so the handler switches to handling on their left for the clockwise section.
-
The dog runs down the line and commits to the first jump while the handler finds themselves a few steps behind.
- The handler takes a diagonal path behind their dog between the landing point of jump one and the take-off point of jump two, moving laterally from the left of the first jump toward the right-hand line. From here, they guide the dog’s turn by pivoting.
-
The handler’s diagonal movement from the left of the jump line to the right behind their dog switches the handling side — that’s the rear cross.
-
It happens on the take-off side of the next obstacle — not on the landing side.
If you wait until after the dog has landed, you’ll be too late to influence their direction. -
By the end of the movement, the dog is on the handler’s left-hand side, ready to continue the course in a clockwise direction.
Why Use a Rear Cross?
In agility, dogs often gain momentum and get ahead of us on a line.
If they’re unsure where to go next, they might slow down, spin, or look back — wasting seconds and causing confusion.
The rear cross lets you communicate direction without needing to run beside your dog.
It’s especially useful when you’re behind and need to cue a smooth, confident turn.
Before teaching a rear cross, ensure:
-
You can recognise and run a diagonal line behind your dog.
-
Your dog understands verbal direction cues — “left,” “right,” or “go.”
-
Your dog is confident and independent enough to commit to obstacles ahead.
-
You’ve proofed that your dog can turn both with you (a pivot) and away from you (a rear cross).
Training Methods: Luring and Shaping
Luring and shaping are two effective methodologies to teach a rear cross.
-
Luring — using a treat or toy to guide your dog into a desired position.
-
Shaping — rewarding small steps toward the final behaviour.
In my classes, I often combine the two for faster learning and confidence-building.
Luring
Luring uses food or a toy to guide your dog through the movement.
It’s a clear visual for both human and dog and helps you practise swapping handling sides.
The goal is to fade the lure, eventually moving your hand in the same way without a reward.
Pros:
-
Provides a clear visual for both human and dog
-
Helps handlers understand where their dog should be in relation to them
Cons:
-
Dogs that rely too much on the lure may struggle with independence
Example: Lured Rear Cross on the flat (Step-by-Step)
-
Start with your dog on your right-hand side.
-
Hold your lure (food or toy) in your left hand.
-
Lean across your body so the lure is right in front of your dog’s nose — like two magnets: lure and dog’s nose.
-
Keep the dog close — if you move too fast or too far, you lose the connection.
-
Trace a gentle C-shape away from your right heel.
-
As the dog follows, cross in front to your left, turning with them — from facing forward to facing right. End with your dog on your left-hand side.
That’s your basic rear cross.
It’s important to remember this drill on the flat is just for practising your movement and timing — the real rear cross on course happens when your dog commits to the next obstacle, not while they’re directly in front of you.
While the C-shape will be less pronounced when jumping, it’s the same scooping motion with your opposite hand — and this groundwork helps both your timing and footwork feel familiar.
Once your dog understands the pattern, repeat without a lure in your hand.
Add your verbal cue — in this example, “right” — as your dog turns away from you
But ultimately, you’ll want to practise turns equally, handling on your left and right.
Once your dog is fluent on the flat, you can take it to a jump.
To practise:
• Sit your dog 5–10 paces from the first jump.
• Cue “go” so your dog drives ahead.
• As they begin to commit — ideally a stride before take-off — say “right” and execute your cross behind.
This timing ensures your dog receives the directional cue just before they leave the ground, setting them up for a smooth landing and turn.
👉 Tip for clarity: If your dog starts on your right, a rear cross turns them right (away from you); if they start on your left, it turns them left.
To recap: lure → fade lure → add your cue → challenge one of the 3Ds (Duration, Distance, Distraction) — a formula dog trainers can use across nearly any skill.
Shaping
Shaping breaks the movement into small goals and rewards the dog for each step toward the final behaviour.
🎥 Watch the video tutorial here: Rear Cross Demo
Example: Shaped Rear Cross (Step-by-Step)
Set up an obstacle and use a strategically placed reinforcer — for example, a bowl placed on the other side of the turn to help your dog succeed.
-
Start handling on the near side of the turn, with your dog on your left.
-
Guide them round clockwise, marking “good” and dropping a reward in the bowl as they complete the turn.
-
Repeat until they start offering the turn on their own.
-
With your dog on your left, release them when they’re looking behind the wing — that shows they’re anticipating the turn correctly.
-
Add your verbal cue — for example, “right.”
-
Once they perform this correctly six or more times, change your own position: move behind them, then ultimately with them on your right, so you’re now handling from the far side, and they’re turning away from you.
In dog training, we use a principle called The 3Ds — Duration, Distance, and Distraction — to design the stages of a programme.
You can progress any behaviour by challenging one element of the 3Ds at a time.
Here’s how I interpret the 3Ds in the rear cross:
• Distance: Once your dog can turn away from you, gradually increase how far from the obstacle you are when cueing. This builds independence so they don’t rely on your movement.
• Distraction: You can add distraction in two ways — by adding elements like a pole, then a jump, or by increasing your own handler movement. For example, start with your dog on your right, obstacle ahead. As you release them, move diagonally behind, finishing with your dog on your left. The goal is to see your dog offer the same obstacle focus and commitment to their turn away from you even as you move.
• Duration: Less relevant here, but for your understanding in future drills, you can think of it as building sequences — asking for multiple obstacles or turns before rewarding.
Final Thoughts
Both luring and shaping have real value:
-
Luring teaches humans the movement — like learning choreography before a dance.
-
Shaping builds your dog’s confidence and independence — so they perform even when you’re not right beside them.
Used together, they create a strong foundation for clear communication on course.
Now you’ve got the exercises — why not plan where you’ll try them next? Maybe your garden, or somewhere during walks?
That’s the rear cross — a simple move that keeps your dog confident and flowing, even when you’re a few steps behind.
If you try it, tag @angliandogworks to share your progress — and follow for more dog training tips.
Tags:
Related articles
-
May 11 2023
Ketshker
-
Mar 30 2023